Few Shot Annotation
Few-shot annotation is a groundbreaking feature in QPIAI Pro, designed to streamline and accelerate the image annotation process for image segmentation tasks. Leveraging the power of semantic clustering and vision transformers, this feature enables efficient and accurate labeling of large, diverse, and domain specific datasets with minimal human intervention.
Traditional annotation methods can be time-consuming and labor-intensive, especially for large-scale or complex datasets. Few-shot annotation addresses these challenges by combining automation with human expertise in an innovative way. Here’s how it works:
- Clustering by Semantic Similarity: The system generates embeddings of the images and automatically organizes them into clusters based on shared visual or contextual attributes, making the dataset more manageable.
- In-Context Learning with Vision Transformers: Cutting-edge vision transformers predict annotations for the clustered images by learning from just a few examples provided by humans.
- Human-in-the-Loop Collaboration: Users annotate a small subset of images within each cluster, which the system then uses to generalize and label the remaining images.
By adopting this semi-automated approach, QPIAI Pro’s few-shot annotation reduces the manual effort required by cutting down the time required by up to 100 times. Whether you’re working with small datasets or massive image libraries, this feature empowers you to annotate data faster, smarter, and with greater confidence.
In the sections ahead, we’ll guide you through the step-by-step process of using the few-shot annotation feature, including clustering datasets, annotating samples, and reviewing and refining results.
💡Steps for few-shot annotation:-
- Click on the View Details button on your dataset card.
- Click the Few Shot Annotation Button
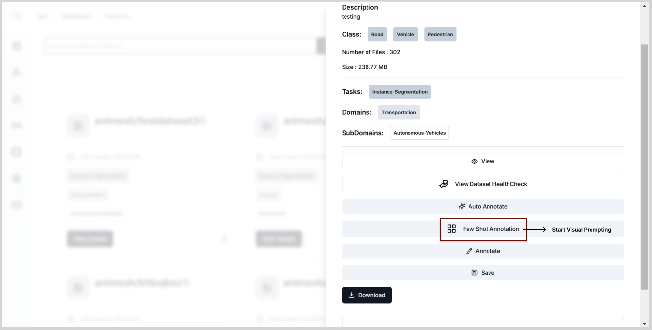
-
Clicking on the Few Shot Annotation button generates embeddings and creates clusters and takes you to the following page:
In this page you can select the number of clusters you want and the number of prompts you want for each cluster
Additionally, you can visualize the images in each cluster with a density metric for each cluster representing how similar the images in a cluster are to each other(From experiments we have observed that the quality of annotations is best when the density is > 0.95).
The default number of clusters gives the user a good starting point with the flexibility to increase or decrease the number. The higher the number of clusters, the denser the clusters get and vice versa.
The next screenshot shows how you can choose the number of prompts for each cluster. Note that the default number of prompts for each cluster is 1 if no number is selected.
-
After selecting the number of clusters and the number of prompts for each cluster, you can click on the Lock and Proceed button at the bottom-right corner. This would lock the number of clusters and prompts and take you to the next page.
-
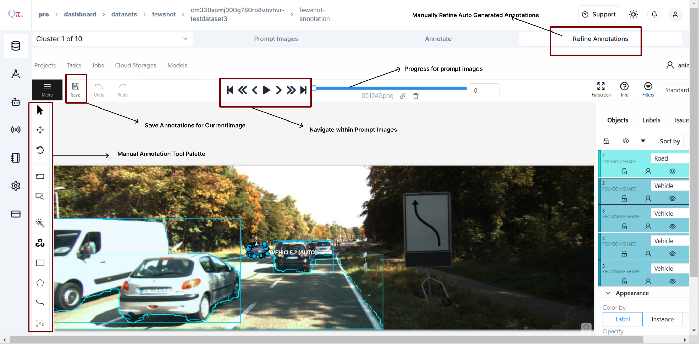
In this page, you can navigate between the clusters to annotate using the dropdown.
After selecting a cluster, you can manually annotate the prompt images in the prompt images tab.
💡Note that to annotate masks you can use ONLY the following tools:
-
Interactor in AI Tools
-
Draw polygon tool
-
Draw mask brush tool
Make sure that you assign the right class labels to the mask annotations.
-
-
After you are satisfied with the prompt image annotations, be sure to click on the save button to save the prompt annotations
-
Navigate to the Annotate tab and click on the Annotate Cluster button
-
After the cluster is annotated, you will be redirected to the Refine Annotations tab.In this tab you can visualize the automatically generated annotations and refine them.
- After the dataset is satisfactorily annotated, click on the save button at the top-right
- corner to save the annotations.
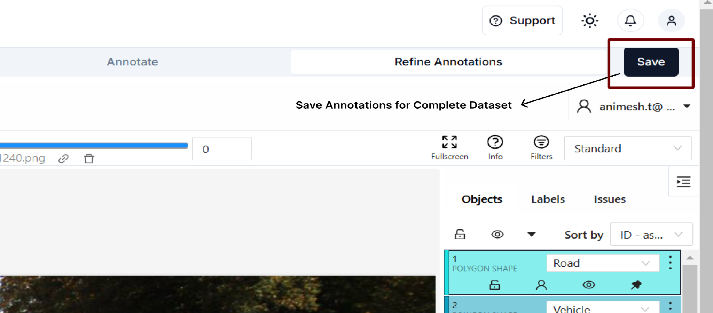
- You can navigate between the Prompt Images, Annotate, and Refine Annotations tabs freely. This flexibility allows you to refine the prompts and re-annotate clusters until you have satisfactory results.