Manual Annotation
Today’s advanced automatic annotation tools have made labeling data for machine learning and AI faster and more efficient than ever. They’ve completely changed how we handle large datasets. But even with these impressive tools, manual annotation is still crucial. It serves as an important quality check to make sure the automated results are accurate and reliable. While auto-annotation can process huge amounts of data quickly, it’s not foolproof—especially when it comes to more complex or nuanced data. That’s where manual annotation comes in. It helps catch mistakes, clarify confusing cases, and provide feedback to improve the automated systems. So, even in a world where automation leads the way, manual annotation is still essential for keeping data accurate and models performing well.
Manual annotation environment
- Clicking the annotation button creates a new annotation task and directs you to the dedicated task interface.
- Click “View Details”
- Click on “Annotate”
- You will land on the annotation environment.
Left Sidebar
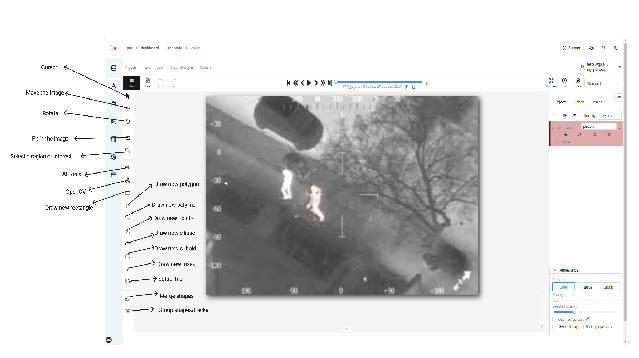
💡The annotation interface features a “**comprehensive toolbar located”**in the left sidebar, providing access to essential annotation tools and functionalities. These tools are specifically designed to facilitate precise and efficient image annotation work:
- Cursor(ESC)
- Move the image
- Rotate
- Fit in the image
- Select a region of interest
- AI Tools (Interactors, Detectors, Trackers)
- OpenCV (Drawing, Image, Tracking)
- Draw new rectangle
- Draw new polygon
- Draw new polyline
- Draw new points
- Draw new ellipse
- Draw new cuboid
- Draw new mask
- Setup tag
- Merge shapes
- Group shapes/tracks
💡Explanation for some of the important tools:
-
This section will explain some important tools in the controls sidebar.
-
NAVIGATION: This block contains the tools moving and rotating the images.
- Cursor - A basic tool.
- Move the image - This is used to move the image without any possibility of editing.
- Rotate - Used to rotate the current frame clockwise or anti-clockwise. You can enable rotate all images in the settings to rotate all the images at the job.
-
ZOOM: This block contains tools for image zoom.
- Fit image - fits image into the workspace size.
- Select a region of interest - zooms a selected region.
-
SHAPES: This block contains the tools for creating shapes on the image.
-
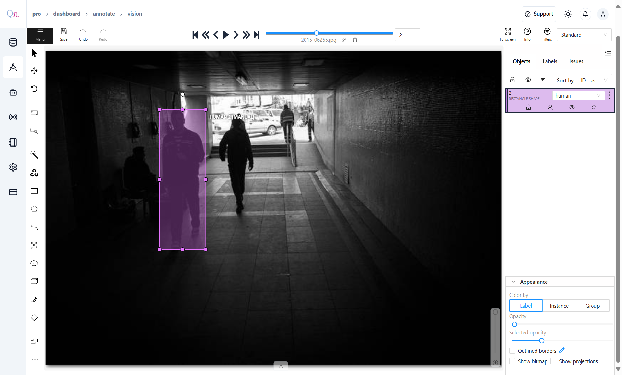
Rectangle:- The Rectangle Box Tool empowers users to create precise bounding box annotations around objects within images. To accommodate different user preferences and annotation scenarios, this tool provides two distinct drawing methodologies, enabling efficient and accurate object demarcation.
“The Rectangle Box Tool provides two efficient drawing methods”:
- Two-Point Drawing: Create boxes by clicking and dragging diagonally between two opposite corners.
- Four-Point Drawing: Define boxes by specifying all four corner coordinates, offering enhanced precision for complex annotations.
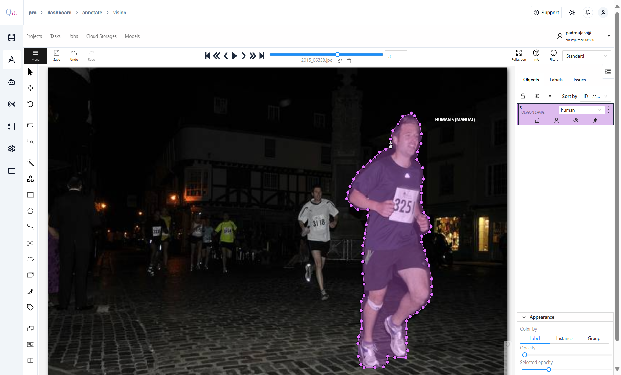
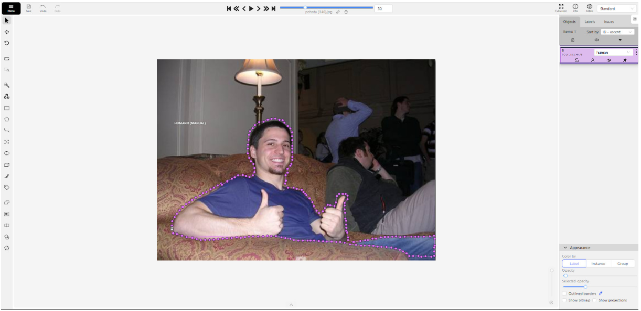
 “Polygon”:- The Polygon Mask Tool enables precise object segmentation through custom-drawn boundaries. Designed for semantic and instance segmentation, it creates detailed masks that perfectly conform to object contours.
“Polyline”:- The Line Marking Tool enables precise annotation of linear features like road markings, accurately capturing object outlines and continuous patterns in your images.
 “Points”:- The Points Tool enables precise annotation of facial and body landmarks, allowing users to mark specific reference points for biometric and anatomical analysis. This specialized tool is particularly valuable for projects requiring detailed mapping of facial features, anatomical structures, or other point-based measurements that demand high precision.
”AI Features in annotation tool” :
Streamline your data annotation process by harnessing the power of AI and OpenCV technologies, which offer both semi-automatic and fully automated labeling capabilities. While traditional interpolation techniques work effectively for static security camera footage, the advanced capabilities of AI and OpenCV tools provide a more versatile solution. These technologies handle a broader range of scenarios, from stable, fixed-camera recordings to dynamic footage where the camera tracks moving subjects or objects exhibiting unpredictable movements. This comprehensive approach ensures accurate and efficient data labeling across all types of video content, significantly reducing the manual effort required in your annotation workflow while maintaining high precision standards.
“AI Interactor” :
Use the interactor to label objects in images by semi-automatically creating a polygon. When creating a polygon, you can use positive points or negative points (for some models):
💡Adding Annotations with AI Interactors
- Select the “Magic Wand” tool and navigate to the “Interactors” tab
- Choose a label from the “Label” dropdown menu to classify your annotation
- Select an AI model from the “Interactor” dropdown menu (hover over the ? icon for model details)
- Toggle “Convert masks to polygons” if needed (applies to mask-based models only)
- Click “Interact” to begin
- Add points using:
- Left-click for positive points.
- Right-click for negative points Note: Point limit varies by model
- Click Done or press Shift+N / N to finish
“AI tools: add extra points” :
💡More points improve outline accuracy, but make shape editing harder. Fewer points make shape editing easier but reduce outline accuracy.
Each model has a minimum required number of points for annotation. The request is automatically sent to the server once the required number of points is reached. The server processes the request and adds a polygon to the frame.
For a more accurate outline, postpone the request to finish adding extra points first:
- Hold down the Ctrl key: On the top panel, the Block button will turn blue.
- Add points to the image.
- Release the Ctrl key, when ready.
💡When using Mask to polygon, you can edit the resulting shape just like any other polygon.
“AI Tracker”
Object tracking algorithms analyze sequential frames within a video or image sequence to identify and follow objects as they move or change over time, effectively highlighting dynamic or changing elements.
In QpiAI-Pro, you can find the interactor in the control bar of the manual annotation tool.
Steps to use AI Tracker:-
- Select the “Magic Wand” tool and navigate to the “Trackers” tab
- Choose a label from the “Label” dropdown menu to classify your annotation
- Select an AI model from the “Tracker” dropdown menu. There are two tracker models in the AI tool, “TransT”.
- Click “Track”, and annotate the objects with the bounding box in the first frame.
- Go to the top menu and click Next (or the F on
- the keyboard) to move to the next frame.
- All annotated objects will be automatically tracked.
- Click Done or press Shift+N / N to finish.
“Right Sidebar” : In the right sidebar, you can see 3 sections, objects, labels, and issues
- Objects: List of allotted objects, including shapes and tracks. You can filter, sort, and adjust visibility or lock objects here
- Labels: Displays the label assigned to each object. You can change labels directly from the sidebar.
- Issues: Allows annotators to mark problems or questions regarding specific objects.
“Lock/Unlock” : Prevents accidental modification of objects.
“Copy/Paste” : Facilitates duplicating object properties between frames.
Saving the annotations and Finishing the job
After completing your annotations, save them by clicking the “Save” option in the menubar. Once saved and finalized, you need to finish the annotation job to apply the changes. Navigate to the menubar, click “Menu,” and select “Change Status.” From there, click “Finish Job” to complete the process.
-