Managing and Viewing Datasets
- QpiAI Pro provides an intuitive interface for managing and viewing your datasets.
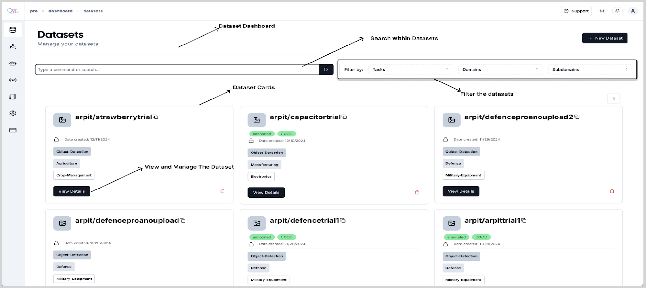
💡Steps to access and manage datasets
- Navigate to the datasets to view all the created datasets.
- View key details such as dataset name, domain, subdomain, data type, creation date, and annotation status.
- Filter and sort datasets based on metadata for easy organization.
- Locate the dataset of interest and click on view details.
- Once you click the “view details” you will get an intuitive dataset management interface as a side bar with following functionalities:
- View: Visualize the dataset in an interactive data visualization window, along with functionality for embeddings-based EDA.
- Dataset Health Check: Assess the quality and integrity of your dataset along with annotation stats and detailed insights.
- Auto Annotate: Automatically generate annotations using advanced AI models for efficient labeling based on provided Text Prompts.
- Few Shot Annotation: Automatically Annotate the datasets using minimal examples, leveraging pre-trained models for accelerated annotations.
- Manual Annotation: Create or refine annotations manually to ensure accuracy & precision.
- Save: Save the generated annotations.
- Download the annotated dataset for external use, integration, or backup.
The dataset can be exported in the following formats:
- COCO
- YOLO
- PASCAL VOC
- Dataset Views: Access and/or manage the saved views for better organization of annotation experiments and/or custom views created during EDA.
- Once you click the “view details” you will get an intuitive dataset management interface as a side bar with following functionalities:

These features simplify dataset management, ensuring high-quality preparation for AI workflows. In the next chapter let us take a deep dive into the dataset visualization and EDA.
Note : For detailed instructions on downloading datasets in different formats, please refer to the Appendix. It provides a comprehensive explanation of all supported export formats and the step-by-step instructions.
Last updated on